Showing posts with label swaps. Show all posts

Wednesday, June 30, 2010

Flowering ATCs

I made a new batch of ATCs for a swap group I'm in. ATCs are Artist Trading Cards, or mini works of art that you trade with other artists. "Trade" is the operative word: no money changes hands. You're just making art so you can then trade and gain the art of another artist.

This group meets once a month. We trade them around the room, then pick a new theme for the next month. This month the theme is "Flowers." I started with flower-printed scrapbook paper. I added a floral rubber stamp, inked in black then embossed with black powder. I colored in the image with Sharpie markers. I always think a few words add to a piece. I wrote in a poem by Emily Dickinson. She's my favorite poet, and many of her poems relate to nature. I finished the back with a smaller square of contrasting paper (I needed to hide the Sharpie pen that went through the back), then signed it, and I was done.


When I make a few cards at once, they always end up slightly different -- different colors, different papers. Stay tuned for next month's ATCs!


P.S. to this post: Obviously, I have no scanner for taking better pictures of my art. Can anyone recommend one?

Tuesday, September 1, 2009

Hot Dragonfly

I got a new toy to play with the other day. It's my new butane torch. Now, I've had a torch for many years. When I was in cooking school we used big, propane torches to do all kinds of things: heating pans for removing cheesecakes or frozen desserts; burning meringue for a perfect key lime pie; and of course burning the tops of creme brulee. I did that for 200 plated desserts at a restaurant when I was the pastry chef there. There's no way you can't feel macho wielding a propane blowtorch. So when I wanted my own torch for cooking at home, of course the big propane daddy was the way to go. No wimpy Williams-Sonoma creme brulee torch for me! I'd be re-filling that baby constantly.

Fast forward a few years, and now I'm using my torch for soldering, coloring metal, and creating beads on wire. I learned torch-fired soldering in a class in a bead store, using the little butane torches. Well, at home of course I was going to use my big macho torch. I set up a safe area on my dining room table by laying down a 12" square tile, placing a fire brick on top, and I was good to go. Until I lit that torch and blew little balls of solder all across my beautiful table! It was like mercury balls running around, only these were red hot. Luckily, I didn't burn the table. From then on, I did all my torch work outside on the patio.

After ten years, the torch for my propane canister has finally died. I had to make that trip to Home Depot for a replacement. And what do I see? The wimpy little torches have grown up! I see the butane torches are stronger, have multiple tips, and can refill easily. I have now un-machoed myself, and will be using this smaller torch. Just the canister of my older one was bigger than it!


I tried my new torch the other day when I wanted to heat some copper pieces to give them a little color. Much to my surprise, I can use this little guy in the house right at my art table! I'm still a safety girl, but it's just not the big, honking thing the other one was. I don't think I'm at risk of accidentally lighting anything else around. And it has an easy "off" button -- the other one you had to twist the dial to turn it off. I'll definitely be using this more, especially when I just want to quickly heat up one thing.

After all this talk off torching, here's a photo of what I made. I cut out wing shapes from 24 guage copper, then torched them for a nice mottled effect. I "sewed" them together with 28 guage wire, then sewed on a little bead I made using yarn, wire and beads. Together they make a nice little dragonfly.


I made this dragonfly to go on a necklace that was started by Carol Moore. She wanted a nature theme, and she started it with a beautiful focal piece -- check out her copper butterfly wing with attached key and resined bezel photo. She said the drilling of the key to attach the rivets was quite an adventure. I'm impressed with how well she cut the copper around her etching of a butterfly stamp. In a month, after one more addition, she'll get her beautiful necklace back. I hope she likes this sneak preview!


This was a fun dragonfly to make -- you may see some more in future creations.

Wednesday, July 15, 2009

Summertime Blues

Sometimes I find amazing beads in my searches. I was specifically looking for something blue, so I could make a blue charm for a Summertime Blues swap. I found these beads at a bead show. I used steel wire since it comes black and it would go with the black veins throughout these beads. I made a simple swirly wrap from one piece of wire, complete with hanger, and there you have it: a blue bead charm. I wouldn't want to hide the beauty of these beads under much else.

Friday, July 10, 2009

Necklace Round Robin

I'm in the sixth month of two 9-month necklace round robins. The latest creation came from Veleta Stafney. Hers was the most unusual of the necklaces, because it didn't have a traditional chain. I was kind of thrown by it at first. Mainly because it was so beautiful as is, I couldn't imagine creating something that would add to it. But I was also thrown because it was so symmetrical. How could I add one item if it through off its symmetry? I finally decided on the perfect place to add a charm: at the end chain that went beyond the clasp. I made a gold love knot from some wire. This was attached with more wire, and I hung a few beads as a dangle. The green glass bead was purchased a long time ago, but I hadn't used it yet because I really don't make any green jewelry! I know, that's strange, but it just isn't my favorite color. Although I can appreciate it in a beautiful necklace like this. I'm glad I was able to use it on something so stunning. This necklace will travel on to three more artists who will add another piece before Veleta gets to see the final product. I think she'll be pleased.

Here's the charm I added.


Here's the entire necklace.

Tuesday, June 30, 2009

Text Charms

The wonderful Maureen Baranov continues to challenge our Charmsters group with interesting charm swaps. Her latest was a swap of Text Charms, as she called them. Her inspiration came from Deryn Mentock. You can check out her blog here. Her June 10 post shows examples of her text charms. She uses wire that is pounded flat into a round-ish shape, and she glues text to the back. Maureen admires other artists' work and then challenges herself (and us) to make our own versions. With much admiration for Deryn, here are our results.


Our task was to examine Deryn's charms and figure out how to make our own. I think we all started with steel wire. That was probably a first for some of us. Steel wire is one of those art supplies that you can get at a hardware store, rather than a bead or craft store, and it's much cheaper than sterling wire. It usually says it is "annealed," which is a process that returns its ductility that it lost during the drawing process. We generally used 18, 19, or 20 gauge wire. The steel wire is dark-coated with a rust inhibitor. We used green kitchen scrubbies or steel wool to rub some of this off. It gives the steel a bit of a shine and prevents the black from rubbing on your hands.

After bending the wire into a round or oval shape, we hammered it flat. This allowed the paper we adhered later to lay flat to it. I used a steel bench block and a chasing hammer to flatten my wire. To attach the paper, I poured a little white glue in a dish. I dragged the wire shape through it, then pressed the wire onto a page. When it was dry, I cut the paper around the wire.


I think everyone else used some kind of a gel product to adhere their paper to the wire. If you lay the wire loop on the page, you can pour, brush or drop a resin to cover the area within the wire. When you have 14 artists trying a technique, they'll try different products. Some used Diamond Glaze, and warned to put it on lightly and watch for bubbles. DG3, which is an art gel by Judikins, the maker of Diamond Glaze, was too sticky for one artist and stuck to her packaging. She also experimented with Glossy Accents and a resin kit, and they both worked. Other successful products used were Plaid's Folk Art Papier Glass Finish in clear (also comes in sepia or antique), All Night Media's Liquid Embossing for Paper (in Antique Glass, Clear Glass or Sepia Glass), and Golden's Soft Matte Medium.

What you did with your text charms was your choice. Some added beads, some made them in leaf shapes or wing shapes. I attached two to a yarn tassel. The yarn is wrapped in wire with some extra wire curled down. The close up picture looks a little hairy -- I think the tassel looks better in real life!


So, thank you to Deryn Mentock for inspiring us, and thank you to Maureen for challenging us. Please visit Deryn's blog called Something Sublime so you can admire the jewelry of this very talented artist.

Friday, June 5, 2009

More Necklace Swaps

Maya Macauley, a friend from my Charmsters group, created a necklace with a wonderful bezel, and eight of us will be adding to it. We're about halfway through the artists, and here's what it looks like so far.


Her theme was "heart and home." Her focal piece is a house-shaped bezel with a red heart surrounded with resin in the middle. I added a piece that has a house-shaped brass piece, that I textured by hammering it against wire mesh. Then I cut out a heart shape from an old dictionary page, painted the back of the metal red, and glued down the heart. In front of the brass piece is an oval copper piece with a stamped sunburst on the front. In front of that is a dangle with beads and a silver charm on the end.


Kim Boehm made a necklace with a white theme. So far, there is a white bird, a white polymer clay disk with a black wave design, and a fringe dangle made with various beads. I added a glass bead that has white on the inside and a swirl of gray/black throughout. I made a free form silver swirl around the bead and dangled a white tear-shaped bead below it. There will be four more creations added to these necklaces before they are done.

Tuesday, June 2, 2009

Necklace Add-ons

I'm continuing in two nine-month-long necklace round robins. Ellen Hagood began this creation, and we're about halfway through adding charms to it. She chose a bird/wing theme. I had an old metal cookie tin that was decorated in a paisley pattern. I snipped out one part of the paisley design, because I thought it looked like a wing. I used Diamond Glaze to place mini seed beads along the edge. On the back, I used StazOn black ink to rubber stamp a small bird. I blotted some distress ink over that to give it some color. I added a bead dangle to it and attached it at two points to the chain. I sent it on its way so the rest of the group could add to it.

Gena Houghton created this next necklace. She made a charm holder where each artist could add her own charm. I love the cocoon bead and the heart cut out of mica.

I added the tassel charm. I used thin wire threaded with seed beads wrapped around the yard to hold the tassel together. I connected a glass bead dangle to it using a jump ring. Obviously I made this while I was finishing my tassel charms for the text charm swap you can see in my blog post below.

Monday, March 30, 2009

Angela's Necklace

I received a beautiful necklace in the mail that originated with Angela Barribeau, a friend from my Charmsters group. She designed the necklace and put on two charms, a crown and a beaded dangle. It then went to the next person in the group, and she added two pieces. When it was my turn, I added three Swarovski pearls with crystal dangles, and a leaf and bead addition near the clasp. This necklace will now travel through the talented hands of six more artists before it returns to Angela. Here's how it looks now.

Tuesday, March 3, 2009

Jewelry Swap

Here's the latest necklace I received for the necklace round robin. This was created by Darlene Moorhead, and I added a cocoon bead to it. I've displayed it on a hand carved pear sculpture that I won in a raffle.

Thursday, February 12, 2009

Happy Valentine's Day

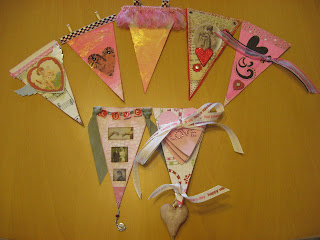
I participated in a swap with the In This House and Garden group. We each made six small banners, decorated in a Valentine's theme. I received some beautiful banners in return.

Wednesday, February 4, 2009

Necklace Round Robins

I'm hosting two necklace round robins over at my Charmsters group. For each one, there are eight women participating. (I'm in both groups.) You start by buying or making a chain, and creating a focal piece for it. You also make a book to go with it and a box to put it in. Then for the next eight months, they travel around the country to each woman in the group. She adds a charm or something to it. In September, we'll get our necklaces back and will see how everyone has added to our design.

One of my necklaces, I call Blue Dreams. Since blue is my favorite color, I thought it would be fun to have a necklace with all blue elements. I bought a silver chain, cut it in pieces, and made a clasp. The focal is glass beads hung by chain, and silver wire that has been bent and hammered. The box is an old cigar box that I painted. The book's covers have been altered with acrylic-painted tissue paper. And the whole thing is tied together with beautiful yarns.


I called my other necklace Natural Beauty. I love the look of wire, copper, and stones. I chose a few beads that look like stones and glass. They're strung on sterling wire and wrapped around a piece of copper sheet that I cut and torched for color. The box is a cardboard box that was junk mail. It contained a spot for a CD and business cards. I adapted these for the necklace and name plate. The notebook is covered with a sheet I made by sandwiching tissue paper, polymer medium, and twigs and leaves from my backyard. I then brushed a thin glaze of orange/brown over top. The whole thing was tied together with various yarns, but I didn't get a photo of that.