Showing posts with label collage. Show all posts

Thursday, February 17, 2011

Butterfly Reminder

Back in January, I told you about my idea to actually try some art projects that I read about in the many mixed media books that I buy. I've finished my first one, which came from Shona Cole's book, The Artistic Mother. Her book has really inspired a lot of people, and I know some artists out there have created art from her inspiring ideas. If you have made anything from her book and posted it on your blog, drop me a line and I'll post a link here.

I chose to do her Butterfly Reminder project. Of course, I can't just copy it exactly -- I need to take her main idea and tweak it a bit. The project is a little hanging piece for your wall that reminds you to do something for the day. In her example, she uses the words "Write Today." Well, that's a good goal, but I was thinking -- I have different goals every day. Sometimes I need to tell myself to write, sometimes to make art, and sometimes to exercise more. Although "exercise more" isn't specific enough for me. If it's vague, I'll never do it. Anyway, I decided I wanted to come up with a way that I could change the words.


After choosing my reminders, typing them on cardstock, and printing them out, I made little mica slots that the words could be slid into. My idea was to have an extra mica slot on the back to store the extra words. I attached the mica pieces using eyelets punched through the balsa wood base. I soon found out the eyelets wouldn't go through one piece of balsa and a piece of mica on the front and another on the back. Instead I just glued a little envelope to the back to hold the words.


I rubber stamped my butterfly design rather than cutting out a downloaded picture, as Shona suggests. I didn't feel like cutting around the edge of the butterfly because I thought the balsa wood was tricky to work with. It splinters easily and pokes your fingers when you cut it. I found that my metal cutting snips were stronger and worked better than regular scissors, so I just used them and kept the balsa wood in a rectangular shape. I did round the edges a bit. Balsa wood must come in different thicknesses, so either mine was thicker than Shona's, or she's just better at cutting than me.


I have two dangles hanging for the words because I wanted to have a verb and a noun for my goals. I used coated copper wire to hang the beads, which means it will always stay shiny. Now I won't have to worry about polishing it over time. If you're curious, some of my other words are: "Fly Toward Your Business", "Fly Toward Exhibiting Your Art," and "Get Moving -- Rollerblade", and "Get Moving -- Play Racquetball."


My next project comes from the book Book + Art -- Handcrafting Artists' Books by Dorothy Simpson Krause. This book doesn't have step-by step instructions for every example, but I will use one of the books as inspiration to make my own. I'm going to make an accordion book, like the one on page 70 called Hearts. It will be a challenge to come up with a subject for the book as well as the process. Would you like to join me in creating your own interpretation of an accordion book?
Wednesday, February 2, 2011

Soldering is Not So Scary

Many of you know that for the last four years I've traveled to Portland, Oregon in October to take art classes at Art & Soul Retreat. I'm changing it up a bit this year, and will be attending their New Orleans retreat in July. I'm excited to be traveling with two friends who are new to the retreat scene. We've chosen one class that we'll take together, then we'll take three others. My friend will be taking a soldering class with Sally Jean Alexander. I took one from her my first year, and totally loved it. She's a thorough instructor, and teaches a project-based class. I recently came across the project I did, which I had given to my mom as a gift.


We collaged papers, using color copies, paint, pencils, and sandwiched them between thick beveled glass. I went with an Oregon theme, using postcards, stamps, a photos, and other items from my mom's Oregon relatives. We soldered down the sides to keep the glass sandwich together. All in all, a good first experience with soldering, which is not that hard after all.


Monday, July 13, 2009

Chasing Bubbles

In a previous post, I showed you a small piece I made with a stamp from Fred B. Mullett. Here's another painting using one of his stamps.


I originally bought these stamps almost 15 years ago when I was planning the nursery for my first child. I wanted a boy/girl theme, and found some bedding with an under the sea theme, featuring fish, coral, seaweed, all in yellow/pink/lavender/green colors. I think I saw his stamps in Rubberstampmadness magazine. That was back when I was making rubber stamped art, and no one in Florida seemed to be doing the same. Anyway, I bought about eight stamps from him. I painted the nursery walls white, then used six different colors of paint to stamp fish all over the room. I did a border around the closet using sanddollar and starfish stamps. If I had a digital photo from that long ago, I'd show you how it looked.

I still have those stamps, and I love to use them in art because I love the real look. He made these stamps by first making a rubbing from the real fish. Because I'm painting on canvas, it's a little hard to stamp right on it since the canvas "gives." Instead, I use Stazon ink, and stamp it on white tissue paper. Then I take a wet paint brush and paint around the image. The water dissolves the tissue paper and you can get a fairly clean tear of your fish image. Then I apply polymer medium to the painted canvas. Lay the tissue down, then lightly brush more polymer medium on top. If you're too rough, you could tear the image. The polymer medium soaks into the tissue, and if you do it right, you won't see the edge of the tissue. You can add more paint or anything else over it after it dries. I'm sure you'll see more of these fish in my collages.

Wednesday, July 8, 2009

Generating Process

In a previous life, I was an accountant. I majored in accounting because I was good at math, and I knew I'd have a guaranteed job when I graduated. All my life I've been good at math, and have loved numbers. Maybe part of that is because my Dad's an engineer, actually an aeronautical engineer. He helped design the rocket engines that went to the moon. Growing up, I was surrounded by books, some of which were his engineering books. So when I found an old engineering book at a garage sale, I knew I just had to have it. Occasionally I'll tear out pages to use in a collage, and here's an example of one of them. The drawing is of a "Generating Process," whatever that means, so that's what I titled the collage. I love the contrast of the pretty colors with the engineering formulas. And I used a tea party doily because it reminded me of gears.

Tuesday, June 9, 2009

Wellington Art Society Show

A couple weeks ago I showed my jewelry at the Wellington Art Society's spring show. And for the first time, I showed some paintings, too! This was a big step for me. I've dabbled in collage and acrylic painting for a couple of years now, but only recently got into it full force. I took a collage class with Eydi Lampasona at the Boca Raton Museum of Art in January. Well, her multitude of techniques, plus her enthusiasm really helped me to connect everything I've learned about collage with acrylic painting. Since then, I've made a couple dozen paintings. I decided to show 11 of them, and here they are.

By the end of the day, I had sold one!

Of course, I displayed and sold my jewelry as well. Here's my jewelry table, complete with a couple of rocks for display. I could make buckets of money if I would just sell my rocks, but they're not for sale.

Monday, March 30, 2009

Shell Seeker

In an earlier post, I talked about the One World One Heart campaign developed by Lisa Swifka. Bloggers were asked to visit other sites, place a comment, and the host of that site might choose your name to win a giveaway. I received a beautiful genie painting from Lisa. In return, I sent her this painting that I call Shell Seeker.

The painting includes layers of painted tissue and some shells I found here in Florida. Lisa lives near the Pacific, so I thought she might enjoy this.

Thursday, March 12, 2009

One World One Heart

The wonderfully giving, and talented, Lisa Swifka hosts an event each year called One World One Heart. Bloggers are invited to join, and give away one of their creations to a lucky winner. The catch is, the entrants must also be bloggers, and they must invite you over to their blog. I was told about this by a friend, and when I checked, I just knew I had to enter.

What a fantastic group of artists! The giveaways were beautiful jewelry, paintings, art supplies. Every time I went on the site, more artists had joined. I was not a giveaway blogger, but I was lucky enough to win something! And I won from the coordinator of One World One Heart, herself, Lisa Swifka! You can check out her OWOH blog here, and you can still see the list of over 900 bloggers who generously gave away their creations.

Lisa also has her own blog, called A Whimsical Bohemian. Be sure to click on the links to her art to be impressed by her talent. (And her prolific-ness. Is that a word?)

The artwork Lisa sent me as a winner is shown below. She made the beautiful genie painting with the crystal jar. I wanted to show you just how well it goes with the paint color in my art studio (O.K., a corner of my bedroom), where I've posted my art wall. All the art you see was created by others, including the charms in the shadow box -- all received in swaps from my Charmsters group.


And the other reason for my post, besides publicly thanking Lisa. I have now personally thanked her, and I sent her a collage I recently completed. I won't post a photo here until I'm sure she's received it in the mail!

Thursday, February 12, 2009

Happy Valentine's Day

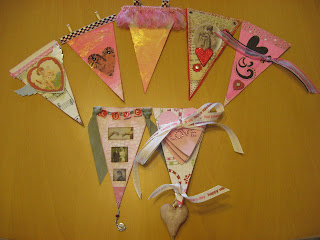
I participated in a swap with the In This House and Garden group. We each made six small banners, decorated in a Valentine's theme. I received some beautiful banners in return.

Friday, February 6, 2009

More Collage

I'm really loving the collage and mixed media class I'm taking with Eydi Lampasona. We're using gel medium to adhere mulch, leaves, twigs, stones, dirt, pine needles, and anything else we can find out in the parking lot, to a gesso'd-board. The gel medium needs to be spread quite thickly. After it dries for a day or so, then you gesso over the whole thing. Then you paint. The first one I did is on canvas. I used purples, reds, blues, then put a little gold on top. This picture doesn't do it justice, but I'm real pleased with it.


I'm so enthusiastic about this technique, that I did another one a couple days later. I used purples, yellow and red. Then I put black on the twigs and branches so they'd stand out. I'm not sure what I'll do with this, but I really like it. But shouldn't we like all our art?

Thursday, February 5, 2009

Collage Class

I'm taking a collage and painting class at the Boca Raton Museum of Art with the wonderful Eydi Lampasona. Eydi calls it "Urban Archaeology" because we are using found materials to make papers, including leaves and twigs and rusty objects. She makes good use of plain white tissue paper, which we alter to use in collages. One of the easiest methods is to spray a sheet with water, drop diluted fluid acrylics, and let it dry. I especially like how splashes of gold paint look on top of other colors. It's a messy job, best done outside. Since I live in Florida, and the weather's nice this time of year, I do it on my back patio. Here's a photo of my sheets laid out to dry. I weigh down the tarp with rocks or paint tubes so the wind doesn't move it around.


This first one is typical of the colors I like to use: blue, red, purple, then add some gold.


I used fiery red and oranges here.


Blue is the standby color I always seem to use.


I challenged myself on this last one and used some green, which is a color I never use in my art. I wonder what I'll do with this? All of them I can tear up and use on a canvas or board. Or use as a background for a journal or an ATC. I used some pink and gold paper for the background on my Valentine banners in a previous post.

Friday, January 30, 2009

Valentine Banners

I was challenged to make these cute mini-banners by a swap group I'm in. I'll be sending these out today, and will get different ones in return. My base is a white tissue paper that's been altered with pink, gold and cream paints. Then I attached it to the banner-shaped cardstock with polymer medium. And last, the embellishments. These were fun to do. Both sides are decorated, so my photos are the first side, then the second side. Stay tuned for photos of the ones I receive, ready for Valentine's Day!

Friday, December 5, 2008

Latest Collage

Just so you don't think I'm only doing jewelry right now, let me tell you about my latest collage. When I signed up for the Fall Fling art festival, I decided to go all out and submit something for the poster contest. Well, I didn't win, but here's the collage I did for it. I prepared a wooden board using gesso, then painted with acrylics. I added oil pastels and charcoal pencil. The photos are color copies, and I added oil pastels to some of them. The whole picture is sealed with a clear gloss spray.


The theme was "Wild Things." I took photos of wild things around my home in Florida. Wild animals, wild plant life. The dolphin is semi-wild, since he lives at the Miami Seaquarium. We watched the dolphin show, then stayed around to take more pictures. This time of year we have mild weather, with lots of sun, so it's a great time to get some wonderful pictures. Here are some other photos I took that day.


This last photo is of a wild iguana outside. In South Florida, there are areas that have huge populations of these reptiles. I guess people had them as pets, then when they got too big, just released them outside. Since they're not native to this area, they have no natural predators. There's a neighborhood down south that is so overrun by them, that they call it Jurassic Park. So far, our neighborhood doesn't have any. But we do have a "Jesus lizard" living in our front garden. That's the kind that runs away when frightened on its back two legs, standing up. He's so skittish, I haven't been able to snap a picture of him.

Wednesday, October 22, 2008

Art & Soul Portland

The first week of October I traveled to Portland, Oregon for my second visit to Art & Soul. Art & Soul is an amazing week full of art classes taught by artists from all over the United States (and some from other countries). You get to choose which day-long class you take each day, from a list of jewelry, journaling, assemblage, collage, painting and drawing classes. I use this trip as an opportunity to learn new techniques, work in different mediums, and try something I've never tried before. But the fantastic part of this trip is the people you meet. Since I went last year, I've "met" a lot of people through internet groups and have trades charms with them, swapped art, and worked on round robin art projects. I couldn't wait to meet these internet friends in person. This is the event where you need to be outgoing, uninhibited, and not be afraid to try something new or walk up to a stranger and introduce yourself. And so I would say, my trip was a success. I met and talked to about a hundred people. I learned new art techniques. I made some funky, interesting art -- if a year ago someone would have said I'd make some art like this, I would have said, you're crazy. So here's some of the art I made in Portland Art & Soul 2008.

I took Nina Bagley's class, Gatherings, on the first day. In that class we were attaching 3-D elements, pictures and dangles to old book covers. (I never thought I'd be ripping a cover off a book for art. But I guess that's what garage sales are for!) I learned how to use a Japanese screw punch, and how to work with mica. Mica had seemed very mysterious to me, not simply because I couldn't find it in any of my local stores. Now I've got my own stash of it, and will be adding it to jewelry and collage projects. Here are the "pages" I did in the Gatherings class.


Last year I took the class Vintage Metal Treasure Deck with Leighanna Light. I loved her techniques, teaching style, and most importantly, her personality. I took a class from her this year, too, called Funky Found Object Canvas Village. In this class, we used canvas, which we painted, collaged, then covered it all in gel medium, then painted again. The difficult part came because we were trying to get gel medium to try in a short period of time. It goes on opaque, but takes up to 24 hours to turn clear. It was dry enough to paint over, but we couldn't really see our collage work underneath to guide us. I went heavy on the final paint, and ended up obscuring a lot of my collage. But I liked the technique a lot, and admire the final results that Leighanna created, so I will do it again. Here is one I made in class.

My last day I took Lisa Kaus' class Be Still My Beating Heart. In this class we painted on wood (after she had primed it for us), added oil pastels and colored pencils, attached 3-D elements, then covered the whole thing in wax to protect it. Everyone did a tremendous job on their projects. This was a good way to end the week, with a great work of art to hang in my home. Here it is.