Thursday, November 19, 2009

Meeting Artists

One of the best parts about attending Portland Art & Soul, and probably most art retreats, is attending the vendor night. Instructors, local artists, and art stores sell their wares to the hundreds of attendees. I look forward to buying unusual art supplies and maybe a couple of small works of art.


This year's vendor night showcased the work of wonderful artists, and yet I didn't buy any art. The prices this year seemed outrageous for today's economy. Although even in a robust economy, a $500 painting is not in my budget. So I was pleased to discover quite a few artists' books for sale. To me, owning a book with beautiful photos of an artist's works is the next best thing.

I came upon a Portland artist named Jesse Reno. He practices "outsider art." He is untrained and yet very skilled. He uses acrylics and paints mostly on wood. Deep, rich colors are used to create fantastic animals and figures. The backgrounds contain words, symbols, and a variety of colors. He told me about an award he won at an exhibition in France.


Unfortunately, I can't afford any of his paintings. Thankfully, he's reproduced a good deal of them in a book. I'm now the proud owner of Jesse Reno's . . . book. Thank you, Jesse, for your interesting art. Here is Jesse and his friend, who is a talented fabric artist. Jesse is on the right.

Wednesday, October 14, 2009

Spontaneous Haiku Painting

I ventured outside of my norm, and took a painting class at Portland Art & Soul. I've done a lot of painting, but haven't had much instruction. Spontaneous Haiku Painting was taught by the wonderful Katie Kendrick. She's a very talented artist from Washington. You can check out her blog, which she calls Joyously Becoming. We were making a book from eight paintings, each painting accompanied by a haiku. Katie said that in the past, her students got so caught up with the painting, that they wouldn't have time to write the haikus. So this class we did it a little differently: for the first thirty minutes, we had the mission of writing eight haiku poems, one for each painting. I used to write poetry when I was in high school, so I guess it was like riding a bike for me. I cranked out eight poems easily. I don't know why I don't occasionally write poetry now. Maybe this will get me going again!

I wrote all my haiku around a beach theme, so I knew the color palette I'd be using for my paintings. The idea was to thin acrylic paint (Golden fluid acrylics) with water so you could drip, spatter, and flow the paint on your wet watercolor paper. I love the randomness and freedom of this technique. Since I mostly do abstracts, this was right up my alley.

After you paint the pages and let them dry, you take a look at them. What do you see? Any shapes or designs pop out at you? Katie sees a lot of animals in hers. I was all about the beach, so that's what I was seeing in mine.

I was going with a blue, sand, coral, palette, like you'd see at the beach or underwater. But after looking at a few paintings I had done, I thought it looked too pastel-ly. I pumped up the color levels with this one on the left. The haiku refers to an experience we've had in Siesta Key, Florida. Our family visits there for a week every summer. The residents (and tourists) celebrate the sunset every night. A group of locals come out to a specific corner, and as the sun is setting, they play drums and one woman plays the trumpet. They play the sun down.
The last painting in the book is the sun setting down.

Monday, October 12, 2009

Art & Soul

I finally feel my head is above water after returning from Portland Art & Soul. My cross-country trip left me in Portland time for a few days. But boy, was it worth it! This was my third trip to Portland for Art & Soul. Half the fun was visiting with friends I've met in the last two years, a lot of which I've swapped with throughout the year. You can feel very close to someone if you've exchanged emails all year, but it's fun to meet them or see them again.

About 16 members of our Charmsters group attended. I met up with most of them Saturday night during dinner. Here's a photo of some of them:

My Saturday class was Copper Enameling with Richard Salley. If you ever have an opportunity to take a class from Richard, you should make every attempt to do so. He makes bold, tribal-like pendants (or should they be called talismans?), and he is a generous, patient instructor. We saw his patience first-hand when a student laid a lit torch on the table and caught it on fire!

We learned to apply enamel to copper pieces. The class samples were leaves. I made my own leaf shape, rather like a heart. But I just couldn't get into using the red, orange and yellow colors of Fall, despite the beauty of the other students' leaves. I guess the Floridian in me, who never gets to see leaves change color, decided to gravitate toward blue. O.K., so these would never be found in nature. I like them anyway.

Saturday, October 3, 2009

Jewelry of the Week

I made this pendant before I left for Portland.

The base is a strip of copper sheet. I torched the copper to give it a little color. I used cold connections to attach the copper wire and beads. I strung this on a simple black cord, rather than adding more beads. Sometimes pendants are stunning when just left as is.

Tuesday, September 29, 2009

Portland Bound

I'm heading to Portland, Oregon today to take art workshops at the Art & Soul Retreat. This is my third year attending. I chose a variety of classes this year: book making, enameling on copper, painting, and making a beaded bracelet. I'll post some photos when I return.

While in Portland, I'll be visiting my brother and his family. I'll leave you with a picture of a gift I am bringing them.

I made a wall hanging out of copper sheet. I cut the heart, hammered it, stamped the letters, then aged it with liver of sulphur. The glass beads were purchased at a craft fair

Monday, September 28, 2009

Vary Your Tastes

An art piece may contain many elements. Visually, there's color, quite often the more, the better. There's finish: matte, shiny, smokey, milky. Shapes and lines pull your eye to the different parts. Texturally, there's soft, hard, smooth, rough, cold, hot, sharp, blunt.

For this necklace, I wanted to introduce many elements by using various beads, wire, metals, and fiber. And so I call this necklace, Vary Your Tastes.

You can see all the colors I used from the mix of beads and the ribbons hanging from the pendant. This necklace combines hammered copper wire, torch-fired copper metal, different types of ribbons, and silver end caps and clasp.

P.S. The beads I used were from Beverly Gilbert's Coral Beach bead soup. Beverly has the wonderful ability of combining many colors, shapes and sizes of beads together to make a beautiful mix. She'll be showcasing her jewelry designs in her new book, Beaded Colorways, due at the beginning of 2010. You can visit her blog here.

Friday, September 25, 2009

Native Symbol

Have you ever found something at a bead show that you thought was way cool, but you weren't sure what you would do with it? I know, that happens all the time. Just change the location from "bead show" to "flea market" or "antique shop" or "art store," and I'm sure you know what I mean. Sometimes these jewelry elements/art supplies sit in your stash for months, or even years. Then one day, and you don't know why that day is different from the others, you pick up that little trinket, bead, -- whatever -- and you know just how you will use it.

And that's how I came up with this new necklace. I call it Native Symbol.

The trinket I found at a bead show is this long center piece. I bought it from a woman who had beads from all over the world. At first I was mad that I didn't write down its country of origin or what it was made of. But then I though it would be more fun to imagine where it was from and what it means. To me it looks like it would be worn by a native people, centuries ago. Whether Native American, Aboriginal, Inuit -- it didn't matter. But I imagine it would be worn to symbolize the power that your family holds in your community. And the colored ribbon reminds me of the brightness of the sun when it sets -- brighter still at that last moment before it drops. I know the trend now is to use steel wire when you want that aged look, but I used sterling silver for this one. I don't think steel was available to the Native Americans. Drop the silver in a little liver of sulphur, and you instantly have that aged look.

Thursday, September 17, 2009

Heart & Soul

I haven't posted any photos here for a bit, but it's not for lack of artistic creation on my part. I've actually been quite busy making necklaces, ATCs, and other collage art. Next week I'll be showing three pieces of jewelry at an Artists' Reception at a local bank. The Wellington Art Society has been invited by Amtrust Bank in Wellington, Florida to hold a one-night reception for their artists. Each participating artist can bring three works of art. I'll be busy all afternoon putting together easels so our members can display their 60+ pieces. After I do the hard work of setting up, I'll do a quick change and be ready for the reception from 5:00 - 8:00. I decided to make three new necklaces for this affair. Here's a sneak preview of one of them.


I started this necklace by making the focal piece. The heart is hammered copper, and I've hung a clutch of ceramic beads below it. The chain links are all hand made -- I wrapped wire around the oval handle of spatula! Hey, anything works, and you'll get a nice consistent look. The side copper pieces say "HEART", "& SOUL". I love the combination of the copper with this cool, sherbet-y green.

Tuesday, September 1, 2009

Hot Dragonfly

I got a new toy to play with the other day. It's my new butane torch. Now, I've had a torch for many years. When I was in cooking school we used big, propane torches to do all kinds of things: heating pans for removing cheesecakes or frozen desserts; burning meringue for a perfect key lime pie; and of course burning the tops of creme brulee. I did that for 200 plated desserts at a restaurant when I was the pastry chef there. There's no way you can't feel macho wielding a propane blowtorch. So when I wanted my own torch for cooking at home, of course the big propane daddy was the way to go. No wimpy Williams-Sonoma creme brulee torch for me! I'd be re-filling that baby constantly.

Fast forward a few years, and now I'm using my torch for soldering, coloring metal, and creating beads on wire. I learned torch-fired soldering in a class in a bead store, using the little butane torches. Well, at home of course I was going to use my big macho torch. I set up a safe area on my dining room table by laying down a 12" square tile, placing a fire brick on top, and I was good to go. Until I lit that torch and blew little balls of solder all across my beautiful table! It was like mercury balls running around, only these were red hot. Luckily, I didn't burn the table. From then on, I did all my torch work outside on the patio.

After ten years, the torch for my propane canister has finally died. I had to make that trip to Home Depot for a replacement. And what do I see? The wimpy little torches have grown up! I see the butane torches are stronger, have multiple tips, and can refill easily. I have now un-machoed myself, and will be using this smaller torch. Just the canister of my older one was bigger than it!


I tried my new torch the other day when I wanted to heat some copper pieces to give them a little color. Much to my surprise, I can use this little guy in the house right at my art table! I'm still a safety girl, but it's just not the big, honking thing the other one was. I don't think I'm at risk of accidentally lighting anything else around. And it has an easy "off" button -- the other one you had to twist the dial to turn it off. I'll definitely be using this more, especially when I just want to quickly heat up one thing.

After all this talk off torching, here's a photo of what I made. I cut out wing shapes from 24 guage copper, then torched them for a nice mottled effect. I "sewed" them together with 28 guage wire, then sewed on a little bead I made using yarn, wire and beads. Together they make a nice little dragonfly.


I made this dragonfly to go on a necklace that was started by Carol Moore. She wanted a nature theme, and she started it with a beautiful focal piece -- check out her copper butterfly wing with attached key and resined bezel photo. She said the drilling of the key to attach the rivets was quite an adventure. I'm impressed with how well she cut the copper around her etching of a butterfly stamp. In a month, after one more addition, she'll get her beautiful necklace back. I hope she likes this sneak preview!


This was a fun dragonfly to make -- you may see some more in future creations.

Monday, August 24, 2009

Objects and Elements

The talented Susan Lenart-Kazmer has challenged her readers to show their best summer color in a jewelry creation on her blog. I've created a three-strand necklace with a large blue and black bead as its centerpiece. I've wrapped the bead with steel wire, and I also used steel wire to make the clasp and jump rings. One strand is full of blue, purple, and silver beads. The black strand is a length of silk cord. And the final strand is bright blue silk sari ribbon, which I bought from Susan's Objects and Elements shop. The sari ribbon comes in many colors -- my bundle is blue, purple, green, all very bright colors. The challenge was to make a piece using the colors of summer. I think I've accomplished that with my summer color necklace.


You can see all the entries to Susan's reader challenge on her blog. Take a moment to vote for your favorite and leave a comment.

Friday, August 21, 2009

Jewelry of the Week

Maybe you've guessed by my studio name that blue is the color that inspires me most. It works beautifully with silver, which is my metal of choice. I made this necklace, which I call Shimmering Silver, to showcase a beautiful blue glass bead I found at a bead show.


I used 18 guage silver wire and made every piece to it except the length of chain at the top. I wrapped the wire, twisted it, hammered it and bent it. I added a few more beads for a little spark of color. The focal bead is hanging below a wrapped hook, which I felt helped it stand out even more. This necklace doesn't have a clasp because it's long enough to go over your head. I love the feel of just the thin chain on my neck. This looks beautiful with a simple black top.

Monday, August 10, 2009

Fall Leaves

I'm starting to see articles about the Fall harvest in magazines, but it's still 90 degrees here in Florida and we're heading for a beach vacation today. Yet somehow, I feel that I'm ready for the Fall. Now, realize that the leaves don't change here, the temperature doesn't really get cooler until the rare December day, and our vegetables are harvested in the Spring. (Right now we're getting mangoes. Yum!) But the kids are getting ready to go back to school, and I'm starting to look forward to the green markets that are open from October to May here. I'm already planning a brunch with friends following a green market visit. I'll pick up freshly made cider donuts, croissants, melons, and we'll bring them home to serve with a big batch of eggs. How fun. But no, we won't have beautiful Autumn leaves to decorate our table.

But I was in the mood for them anyway, so I did the next best thing -- I whipped up a bunch of watercolor leaves. I used watercolor paper and cut it into leaf shapes, then I colored them with orange, green and purple paints. This took a couple coats to get the shades I wanted. I also used a stylus to draw lines into the leaves.


I just finished making some silver links to give to friends, and thought these leaves would be a perfect tag to attach them to. The links were made using 4" of wire wrapped around a highlighter pen. That seemed about the right diameter. Then I wrapped the wire "tails" around the ring, and they were done.

I punched a hole at the top of the leaves and attached a couple pieces of yarn and some ribbon. Here are the finished leaves with the silver links attached.

Wednesday, July 15, 2009

Summertime Blues

Sometimes I find amazing beads in my searches. I was specifically looking for something blue, so I could make a blue charm for a Summertime Blues swap. I found these beads at a bead show. I used steel wire since it comes black and it would go with the black veins throughout these beads. I made a simple swirly wrap from one piece of wire, complete with hanger, and there you have it: a blue bead charm. I wouldn't want to hide the beauty of these beads under much else.

Monday, July 13, 2009

Chasing Bubbles

In a previous post, I showed you a small piece I made with a stamp from Fred B. Mullett. Here's another painting using one of his stamps.


I originally bought these stamps almost 15 years ago when I was planning the nursery for my first child. I wanted a boy/girl theme, and found some bedding with an under the sea theme, featuring fish, coral, seaweed, all in yellow/pink/lavender/green colors. I think I saw his stamps in Rubberstampmadness magazine. That was back when I was making rubber stamped art, and no one in Florida seemed to be doing the same. Anyway, I bought about eight stamps from him. I painted the nursery walls white, then used six different colors of paint to stamp fish all over the room. I did a border around the closet using sanddollar and starfish stamps. If I had a digital photo from that long ago, I'd show you how it looked.

I still have those stamps, and I love to use them in art because I love the real look. He made these stamps by first making a rubbing from the real fish. Because I'm painting on canvas, it's a little hard to stamp right on it since the canvas "gives." Instead, I use Stazon ink, and stamp it on white tissue paper. Then I take a wet paint brush and paint around the image. The water dissolves the tissue paper and you can get a fairly clean tear of your fish image. Then I apply polymer medium to the painted canvas. Lay the tissue down, then lightly brush more polymer medium on top. If you're too rough, you could tear the image. The polymer medium soaks into the tissue, and if you do it right, you won't see the edge of the tissue. You can add more paint or anything else over it after it dries. I'm sure you'll see more of these fish in my collages.

Friday, July 10, 2009

Necklace Round Robin

I'm in the sixth month of two 9-month necklace round robins. The latest creation came from Veleta Stafney. Hers was the most unusual of the necklaces, because it didn't have a traditional chain. I was kind of thrown by it at first. Mainly because it was so beautiful as is, I couldn't imagine creating something that would add to it. But I was also thrown because it was so symmetrical. How could I add one item if it through off its symmetry? I finally decided on the perfect place to add a charm: at the end chain that went beyond the clasp. I made a gold love knot from some wire. This was attached with more wire, and I hung a few beads as a dangle. The green glass bead was purchased a long time ago, but I hadn't used it yet because I really don't make any green jewelry! I know, that's strange, but it just isn't my favorite color. Although I can appreciate it in a beautiful necklace like this. I'm glad I was able to use it on something so stunning. This necklace will travel on to three more artists who will add another piece before Veleta gets to see the final product. I think she'll be pleased.

Here's the charm I added.


Here's the entire necklace.

Wednesday, July 8, 2009

Generating Process

In a previous life, I was an accountant. I majored in accounting because I was good at math, and I knew I'd have a guaranteed job when I graduated. All my life I've been good at math, and have loved numbers. Maybe part of that is because my Dad's an engineer, actually an aeronautical engineer. He helped design the rocket engines that went to the moon. Growing up, I was surrounded by books, some of which were his engineering books. So when I found an old engineering book at a garage sale, I knew I just had to have it. Occasionally I'll tear out pages to use in a collage, and here's an example of one of them. The drawing is of a "Generating Process," whatever that means, so that's what I titled the collage. I love the contrast of the pretty colors with the engineering formulas. And I used a tea party doily because it reminded me of gears.

Monday, July 6, 2009

Jewelry of the Week

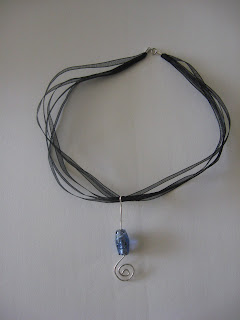
Sometimes you find a bead you think is so beautiful, you just want to showcase it by itself. I don't even remember where I got this bead, but it probably came from a jewelry show. I seem to find the best glass beads from shows. I made a simple silver wire hanger, and placed it on a multi-strand ribbon. These ribbon necklaces may not be for everyone, but I love them.

Thursday, July 2, 2009

City Center Public Art Mural Project

The City of West Palm Beach recently opened their new City Hall and Library complex. They invited area artists to make a 4" x 6" work of art on a wooden block. These blocks will then be displayed somewhere in the center. I contributed two blocks, and here is one of them. I used a rubber stamp made by Fred B. Mullett from one of his fish prints. I included a dictionary page and gave it a light coat of paint. Hopefully it will be mounted low on the wall so people can read the page!

Tuesday, June 30, 2009

Text Charms

The wonderful Maureen Baranov continues to challenge our Charmsters group with interesting charm swaps. Her latest was a swap of Text Charms, as she called them. Her inspiration came from Deryn Mentock. You can check out her blog here. Her June 10 post shows examples of her text charms. She uses wire that is pounded flat into a round-ish shape, and she glues text to the back. Maureen admires other artists' work and then challenges herself (and us) to make our own versions. With much admiration for Deryn, here are our results.


Our task was to examine Deryn's charms and figure out how to make our own. I think we all started with steel wire. That was probably a first for some of us. Steel wire is one of those art supplies that you can get at a hardware store, rather than a bead or craft store, and it's much cheaper than sterling wire. It usually says it is "annealed," which is a process that returns its ductility that it lost during the drawing process. We generally used 18, 19, or 20 gauge wire. The steel wire is dark-coated with a rust inhibitor. We used green kitchen scrubbies or steel wool to rub some of this off. It gives the steel a bit of a shine and prevents the black from rubbing on your hands.

After bending the wire into a round or oval shape, we hammered it flat. This allowed the paper we adhered later to lay flat to it. I used a steel bench block and a chasing hammer to flatten my wire. To attach the paper, I poured a little white glue in a dish. I dragged the wire shape through it, then pressed the wire onto a page. When it was dry, I cut the paper around the wire.


I think everyone else used some kind of a gel product to adhere their paper to the wire. If you lay the wire loop on the page, you can pour, brush or drop a resin to cover the area within the wire. When you have 14 artists trying a technique, they'll try different products. Some used Diamond Glaze, and warned to put it on lightly and watch for bubbles. DG3, which is an art gel by Judikins, the maker of Diamond Glaze, was too sticky for one artist and stuck to her packaging. She also experimented with Glossy Accents and a resin kit, and they both worked. Other successful products used were Plaid's Folk Art Papier Glass Finish in clear (also comes in sepia or antique), All Night Media's Liquid Embossing for Paper (in Antique Glass, Clear Glass or Sepia Glass), and Golden's Soft Matte Medium.

What you did with your text charms was your choice. Some added beads, some made them in leaf shapes or wing shapes. I attached two to a yarn tassel. The yarn is wrapped in wire with some extra wire curled down. The close up picture looks a little hairy -- I think the tassel looks better in real life!


So, thank you to Deryn Mentock for inspiring us, and thank you to Maureen for challenging us. Please visit Deryn's blog called Something Sublime so you can admire the jewelry of this very talented artist.

Jewelry of the Week

I made this necklace when I was experimenting with velvet ribbon as an addition to jewelry. A friend doesn't like the feel of chain on her neck, so I came up with this soft ribbon as an alternative. I used all sterling silver accents, wrapping a 24 gauge wire around the ribbon to attach it to jump rings. The focal point is a free form wire pendant with a beautiful glass bead. I think I used 18 gauge for it. The long dark beads are actually silk ribbon wrapped around silver, with a 22 gauge wire and beads wrapped around to hold the ribbon in place. Some artists call these "cocoon beads." This necklace was fun to make.

Saturday, June 13, 2009

Becky's Hearts

You know how you go to someone's website, click on a link, and are pleasantly surprised to find someone else's wonderful site? That happened to me a few months ago. Now stay with me while I tell you this round-about, degrees of separation story.

I live in Florida. My brother and his wife live in Portland, Oregon. His wife told me their neighbor recently moved down the block, and they really loved having her as a neighbor. She has an internet company that sells socks. Imagine that -- she loves socks so much, that that's what she sells now. Talk about following your dreams. In fact, she calls it Sock Dreams. I found it on the internet, and you can check it out here. The site is wonderful, full of color and fun descriptions. (I even ordered a few!)

It led me to the Sock-Dreams blog. I scanned down a few posts, a lot where customers write in as guest-bloggers describing their yummy socks. The owner posted her own note about a guest-blogger who loved to write in, yet she discovered that she had recently passed away. How sad! Here's the post, and if my link doesn't work, just look for the September 12, 2008 entry.

Becky Jones was an artist who also loved her socks, and loved to write about them. And I love how she included some of her artwork in the photos of her socks that she added to the sock blog. Anyway, I found Becky's blog, and if you check it out, you'll probably be struck by her beauty, as I was. And then you go down and look at her art -- how wonderful! She has such a use of color that makes the subjects jump right out.

I was so moved by her paintings, I emailed her brother, who passed it on to her mother, and through her glorious generosity, I am now an owner of four of Becky's paintings. I just love having them. How giving of her mother to share them with me. Here they are. Maybe you can take a moment to check out her blog and marvel at what a wonderful and prolific artist she was.

Tuesday, June 9, 2009

Wellington Art Society Show

A couple weeks ago I showed my jewelry at the Wellington Art Society's spring show. And for the first time, I showed some paintings, too! This was a big step for me. I've dabbled in collage and acrylic painting for a couple of years now, but only recently got into it full force. I took a collage class with Eydi Lampasona at the Boca Raton Museum of Art in January. Well, her multitude of techniques, plus her enthusiasm really helped me to connect everything I've learned about collage with acrylic painting. Since then, I've made a couple dozen paintings. I decided to show 11 of them, and here they are.

By the end of the day, I had sold one!

Of course, I displayed and sold my jewelry as well. Here's my jewelry table, complete with a couple of rocks for display. I could make buckets of money if I would just sell my rocks, but they're not for sale.

Friday, June 5, 2009

More Necklace Swaps

Maya Macauley, a friend from my Charmsters group, created a necklace with a wonderful bezel, and eight of us will be adding to it. We're about halfway through the artists, and here's what it looks like so far.


Her theme was "heart and home." Her focal piece is a house-shaped bezel with a red heart surrounded with resin in the middle. I added a piece that has a house-shaped brass piece, that I textured by hammering it against wire mesh. Then I cut out a heart shape from an old dictionary page, painted the back of the metal red, and glued down the heart. In front of the brass piece is an oval copper piece with a stamped sunburst on the front. In front of that is a dangle with beads and a silver charm on the end.


Kim Boehm made a necklace with a white theme. So far, there is a white bird, a white polymer clay disk with a black wave design, and a fringe dangle made with various beads. I added a glass bead that has white on the inside and a swirl of gray/black throughout. I made a free form silver swirl around the bead and dangled a white tear-shaped bead below it. There will be four more creations added to these necklaces before they are done.

Tuesday, June 2, 2009

Necklace Add-ons

I'm continuing in two nine-month-long necklace round robins. Ellen Hagood began this creation, and we're about halfway through adding charms to it. She chose a bird/wing theme. I had an old metal cookie tin that was decorated in a paisley pattern. I snipped out one part of the paisley design, because I thought it looked like a wing. I used Diamond Glaze to place mini seed beads along the edge. On the back, I used StazOn black ink to rubber stamp a small bird. I blotted some distress ink over that to give it some color. I added a bead dangle to it and attached it at two points to the chain. I sent it on its way so the rest of the group could add to it.
Gena Houghton created this next necklace. She made a charm holder where each artist could add her own charm. I love the cocoon bead and the heart cut out of mica.

I added the tassel charm. I used thin wire threaded with seed beads wrapped around the yard to hold the tassel together. I connected a glass bead dangle to it using a jump ring. Obviously I made this while I was finishing my tassel charms for the text charm swap you can see in my blog post below.

Thursday, May 21, 2009

Inspiration

As artists, we can be inspired by a beautiful sunset or a speckled bird's egg found beneath a tree. But more often, we find ourselves admiring the work of other artists. One jewelry artist whom I admire is Deryn Mentock. She is a prolific and imaginative jewelry designer who is not afraid to incorporate unusual items, like steel wire or pages of text, into her designs.

In my Charmsters group, we are 90 artists who challenge ourselves to create charms that we swap with one another. A hostess chooses a theme, which could be a holiday, a color, a jewelry technique, or a material.

Our latest swap was hosted by Maureen Baranov. She was so inspired by Deryn Mentock's text charms that she chose that as our theme. Fourteen of us examined Deryn's creations and came up with our own methods of making a text dangle. What was added to the dangle was our choice.


I used steel wire to make my round charms. They were backed with pages from a 1935 dictionary. My dangles are attached to a yarn tassel that is held by twisted wire and a jump ring. Will my tassels inspire another artist?


Here is how I packaged my charms. Check out my blog in a week or so after I've received 13 other charms from some fabulous artists.

Monday, May 11, 2009

Jewelry of the Week

I've decided I'd like to showcase a jewelry item each week. I use a variety of jewelry elements in my creations, such as crystals, twisted wire, metal, and pottery beads, and I really think I should show more pictures here so my readers can see what I've made.

The first Jewelry of the Week is a necklace that I've called Forest Lightning. The inspiration came from the raku-fired bead dangling at the bottom. The bead has such a spark and movement to it, that it reminded me of lightning. I wanted to create a wire piece to hang it, and I knew copper wire was the way to go. The green glass bead above the wire is one I've had for awhile. I don't usually work in greens, I'm more of a blue girl, but I loved the variegated colors in this bead so I had to get it. Using the raku and the green beads, I searched for more beads to accent them. I found a strand of oddly-shaped glass beads, and it all came together. The muted greens reminded me of a forest when the sky is dark gray ready for a thunderstorm. And here you have, Forest Lightning.

Friday, April 24, 2009

Keys and More Keys

Those Charmsters are at it again. Laurel Steven recently hosted a charm swap called "Keys to Spring." We each interpreted that in our own way, using keys as the base. In Florida, I think of going to the beach in the Spring. Spring Break was always our traditional time for heading to the beach after a cooler Winter. I know, our Winters aren't that cool, and people do go to the beach then. But it's mostly people from up north. I wouldn't stick my foot in the water in January.

I've had some mini-shell beads for awhile, but haven't done much with them. They were perfect for my beach theme for Keys to Spring. I used thin gold wire to wrap beads and shells around the key. Then I used more wire and beads to make a loop at the top with a jump ring. Here they are.

I got these old keys from Adam and Eve Salvage in West Palm Beach. If you're a real user of old stuff, you'll love this place. Hinges, door knobs, chandelier pieces, molding, stained glass windows. You could spend hours in there. I bought a bunch of keys, more than I needed for this project. Just what shall I do with the rest?